Friday, December 29, 2017

Reversible Draperies Tutorial - Part 2 (hemming, joining front & back, pleating)

This is a continuation of my Part 1 Blog for Reversible Drapery Panels (a Non-Mini project!) which covers hemming, sewing the front to back and pleating the panels.

A. SEWING THE FRONT AND LINING PANELS:
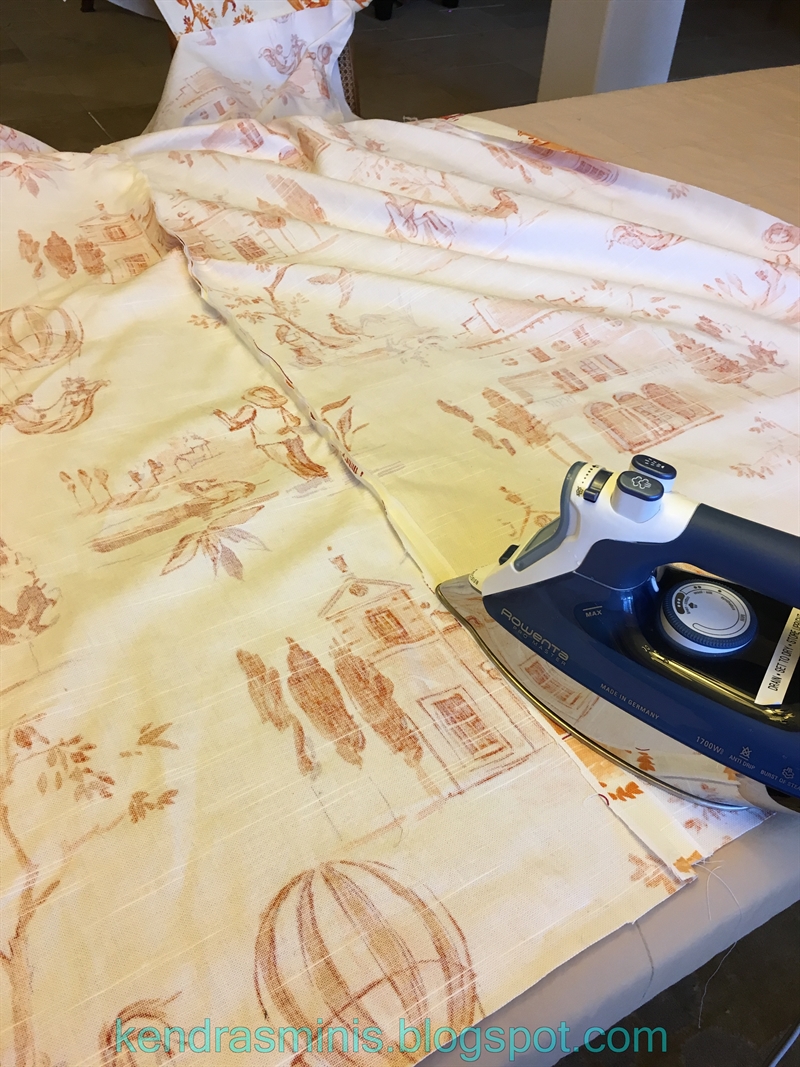
  1. Bottom hem – 4”plus 4” (8 “ total) across full and half widths after they have been seamed together.  Your iron is your friend!  Use the quilter’s square for easy measuring.  Iron the double hem then use your blind hem stitch to sew it.  Hem all panels before moving on so you can make sure the design is the same at the bottom edge.  Iron the hems after blind stitching also.
  2. For the lining (or back side fabric), repeat all previous blog steps for cutting, matching and seaming the lining fabric.  Then hem the lining fabric (step 1, above).
  3. Slip drapery weights into open hems and tack in.
B. SIDE SEAMS, SEAM FRONT AND LINING TOGETHER
  1. Measure up from bottom hem and mark the finished length (your rod height) all across the top on the wrong side of the face fabric (the fabric that will be pinch pleated).  Use the fabric marker and the quilting square/yardstick to keep it straight and square with the selveges.  My rod height was 111 so I measured up and marked 111” from the bottom hem.  Write this measurement down if you are not making these all within a short time period.
  2. Baste the pleater or header tape onto wrong side of the face fabric (the fabric side where you want pinch pleats) just below the marked line.  Baste it just about ½ inch down from the marked line. You can remove the basting later so use contrasting thread.  In the photo below there was a lot of extra fabric to the right of the header tape that was trimmed off after sewing the side seams.
  3. Sew lining to front fabric on side and top seams starting with hems:
  4. Match up the hems.  UNLIKE most drapes where the lining hem is a little above the face fabric, since these are reversible drapes, the two hems should match up at exactly the same length.
  5. When you get to the top, sew just above the buckram but don’t sew into buckram. (OK to sew the buckram into the side seams, though).
  6. Trim sides and top seam.  Turn inside out, press.
  7. If desired, sew on front edge trim (different thread color for each side; 3.5 stitch length).  I didn’t worry that I was putting trim on only one side or that it might show on the opposite fabric because when the curtains are turned around, that side with the trim becomes the “return” for the opposite side.  You can even fold it back so it doesn’t show.
C. PLEATING THE HEADERS 
(Note – for my curtains one side was pleated with double butterfly pinch pleats.  The reverse side (lining side) was the back side of those pleats – which looked like inverted pleats.  Here is how I did it:
  1. First I calculated and spaced my pleats based on a finished panel width of 79” (one and one half fabric widths):
    a.    Returns - 5” each x 2 = 10” (unpleated area at each side hem)
    b.   6” each pleat x 7 pleats per panel = 42” (6” is large for a pleat but scaled well for 111” length)
    c.    4.5” each space between pleats x 6 spaces = 27”
    d.    Total of above = 10 + 42 + 27 = 79”
  2. Mark pleats and spaces with water soluble fabric marker.  I hand basted these since they were so stiff and thick – pins wouldn’t stay.  To keep the pleats straight and even, fold the heading down the center of the pleat and keep the top edges square and aligned with each other while basting.
  3. Sew in the 7 pleats through the header tape.  Remove basting stitches before next step or you won’t be able to flatten them out nicely.
  4. Here is something I did to make these curtains reversible – I sewed the rings inside a “pocket” made inside the pleat.  This way there are no drapery pins to have to remove and re-insert each time I reverse my curtains.
  5. Open out and flatten the pleat centering the crease (for double ‘butterfly’ pleat).  Note that in the photo below the next step (6) has already been done.
  6. Turn the panel over to the inverted pleat side. Stitch in the ditch (made by the pleat) starting 1-1/4 inch down from top to anchor the pleat on the opposite fabric side. Stitch just down to where the buckram ends (about 2-3/4inches total).  I only stitched between the pins.
  7.  After stitching, turn over to the pinch pleat side.  The 1-1/4 inch un-stitched area leaves a ‘pocket’ for sewing in curtain rings deep enough to hide them.
  8. Sew in rings in the ‘pocket’.  For the two ends (‘returns’) I just opened the top seam where the two fabrics were sewn together, removed stitches for about ½ inch and shoved the small ring down into there and tacked it in place.
  9. Tack pleats together near top with buttonhole thread.
  10. Press, hang.
I hope someone out there gets the urge to make reversible curtains also!  Now it is back to the "miniature world" (the focus of my blog!)

Thursday, December 28, 2017

Reversible Draperies Tutorial - Part 1 (measuring, cutting, joining widths)

Just before Christmas I diverted from minis to my “big house” (the one I live in).  I wanted curtains for my dining room for the holidays.  I couldn’t decide between all the beautiful fabrics so I thought I would try to make a reversible drapery – with two different fabrics (it was still hard to narrow it down!).  I thought it might work because I was needing stationary panels (ones that just stay in place and don’t get pulled across the window).  The “lining” side could be a second fabric and I could just turn them around when I get tired of the front fabric.  So… it worked!  There were a few tricks I had to do to make them reversible (see the tutorial below).
The face fabric I chose with the pinch pleats (toile) is called “Villa Tuscano Toile” in Tangerine by Ronnie Gold.  On the “front” (orange toile) I made double pinch pleats instead of triple.

The ‘lining’ side is called Elton by Kaufmann in the color “Yolk”.  On the 'lining' side you can see  the  “inverted pleat” – it’s actually just the back of the pinch pleat!  I plan to reverse to the yellow side for spring and summer.  The Elton fabric is a loose weave but very lustrous when you see it up close, which I can't capture in the photos.


I didn’t use drapery hooks but instead sewed the rings into the pleats hiding them somewhat.  That way I don’t have to keep removing the hooks every time I turn the curtains around making lots of holes in the fabric.

The tricks I used that are different from regular lined drapes are  1) both the front and lining panels are exactly the same width (usually the lining is smaller) 2) making both hems aligned evenly with each other; 3) sewing in the rings instead of using hooks and 4) instead of folding the fabric around the header tape I just sandwiched it between the front and lining fabric with a seam across the top.  These fabrics were thick enough to make pleats without the extra folded layers.
See below for how to make reversible draperies. 

PART 1 TUTORIAL FOR REVERSIBLE DRAPERIES:
My measurements: Tangerine Toile – 27 inch vertical repeats, I cut 5 repeats (125 inches)
Elton Yolk needed 10 repeats for 125 inches; finished length 111 inches, 7 pleats plus 2 end rings for 9 rings total each 1-1/2 width panel)

Helpful tools: a 6 inch wide see-through quilter’s square, yardstick, water erasable fabric marking pen

Working surface: I put all the leaves into my dining table, covered it with a blanket and pinned the blanket below the table (Note I wasn’t careful with the steam iron and raised the wood grain of my table so don’t make my mistake!!)

Notions: Drapery heading, 4 inch wide (paper type non-woven buckram, “header tape”), pins, needle and thread for basting, drapery rings – the kind with a double ring (one smaller for sewing onto the panels and one larger for going over the pole), drapery rods.

A.    MEASURING:
  1. When buying fabric that has a large vertical repeat (10 inches or more) buy at least 1 extra repeat for each cut (for 4 panels, buy at least 4 extra repeats).  Most home décor fabrics only sell in full yards so take into account.
  2. To figure how much length to cut for each window panel you need consider: a)  The finished height you will hang the curtains (usually measured to the bottom of the rod if you are using rings). b) The vertical repeat of the fabric. c) Add 8” for hem (double 4” hem)  d) Consider also the drapery rings.  Since I didn’t consider this my panels were all too long, a happy mistake since I wanted them to break on the floor just a little.
  3. For final yardage, consider whether you want double or 1-1/2 widths (1 width being 54”, for most home-décor fabrics).
  4. Measure and mark fabric with water erasable fabric marker
  5. Measure and figure out how to cut and match seams for the ½ widths.  I figured out how many repeats I needed for each panel length then cut all panels with the same number of repeats starting at the very same spot in the design.  Trim off any extra (or work it into the top or bottom hem). Then every panel will match up exactly with each other when joined and when hung.
B. CUTTING – VERY IMPORTANT before you make your first cut, STRAIGHTEN the edge.  If you don’t do this every length you cut after this will not be straight.
  1. Line up a quilter’s wide square ruler or an L-square against (parallel to) the selvege.   Place a yardstick 90 degrees against the lower edge of the square, near where you are going to trim the fabric.  Check that the design is straight against the yardstick (but it may not be).
  2. Mark along the yardstick with a WATER SOLUBLE fabric marker.  Cut on the line through both thicknesses. 
  3. Now you can measure and cut your panels using the measurements (# of repeats) you have calculated.
C. JOINING WIDTHS:
  1. DON’T TRIM SELVEGES YET!  You will need to see how the pattern matches up first; sometimes manufacturers extend the design a little bit on selveges for overlapping seams, so don’t trim it off until you have decided how to seam it together.
  2. To cut the half widths, fold fabric in half lengthwise and cut down center fold to make a half width.  DON’T SEAM THE WIDTHS AT THIS CENTER CUT EDGE – LET IT BE THE SIDE HEM!!
  3. On some printed fabrics there are registration marks, or even copyright symbols along the selvege that can be used to match widths at the right spot for the side seams, so you can match the design.
  4. Match up the full and half widths together selvege to selvege instead of center to selvege (to take advantage of the extra design for overlap on the selvege edge).
  5. Seam full and half widths together matching design then trim off selveges.
  6. Iron the seams open flat.  It will look so much nicer when they are done (and very professional).

In Part 2 I will tell how to seam the two sides together and finish the draperies.  Here is another photo of the front and back of a panel:

Tuesday, April 11, 2017

Tutorial - Billiard or Pool Balls and Triangle Rack

This project is a departure from the norm for me because it’s not pink or vintage looking.  I made the pool balls for my friend, Sammy.  She bought a lovely miniature pool table at an estate sale but when she got home the balls were gone (probably discarded among the tissue while being packed up by non-miniaturists hosting the sale).  But, anyway, I felt bad for her so I decided to try to make some.  Here is how I made them.

The supplies I used:

A few of the supplies used

For the Billiard balls:
5mm acrylic beads (cream or white– from Ebay)
Printed pool ball numbers (attached pdf file)
Tiny paint brush
Circle punches (1/8 inch and 1/16th inch)
White glue (I used Instant Grrrip in a tiny needle dispensing bottle)
Holding sticks – such as “Pic-n-Stick” wax holding sticks
     (Micro Mark Tools) OR toothpick with a blob of blue-tack
Krylon Triple Thick glaze (I used brush on but spray is OK too)
Piece of craft foam (art foam)
tweezers (really helpful)
toothpick
Acrylic paint (red, blue, green, yellow, orange, purple, maroon, black)

For wooden triangle:
Thick popsicle stick, or scrap wood ( 1/8” thick by ¼ inch wide  - I used one from a corn dog)
Stain pen (to stain wood triangle rack)
Wood glue
Index card and double stick tape
Miter box with  60 degree angle
Sandpaper or emery board (emery board is good for inside the triangle)
15 unpainted 5 mm beads for sizing the triangle

Pool balls come in sets of 16: 8 solid color, 7 striped and one (cue ball) is usually white.  Google pool ball sets to see the colors and which numbers are striped, etc.  Solid and striped balls are treated a little differently (you’ll see why after they are done).
  1. Using the tiny 1/16th inch circle punch, punch out about 20 small circles from white paper (printer paper is OK).
  2. Put a tiny blob of white glue on one hole  of one of the beads.  Cover the hole with a 1/16th inch paper circle.  Let glue dry thoroughly.  Do this for all the beads covering only one hole on each. The other hole will be covered with a number later.
  3. Cue ball – for this one which will not be painted, cover both holes with a paper dot.  Set it aside.
    Cue ball with small paper dot covering hole
  4. Solid Color Balls – insert a toothpick into the open hole as a handle while painting the balls.  Paint the entire bead right up to the toothpick and stick the toothpick into some Styrofoam to dry.  Paint one of each color (there should be 8 total).
  5. Striped balls – the difference here is that the stripe has to cover both holes so it’s too hard to paint up next to the toothpick neatly.  Instead of a toothpick I used a “Pic-n-stick” wax holder to hold the beads while painting the stripe.  Use a fine brush for painting, you might need 2 coats. There should be 7 of these - in all colors except black.
  6. Number labels – punch out the numbers on this diagram {pdf - click here!} document with a 1/8th inch punch.  Try to center the number.   Cup them so they will fit tighter against the bead.  To do this, place them printed side down on a piece of craft foam and rub with the end of a paintbrush in a circle pattern until they are slightly cupped.  Glue them over the open holes and press down so they are smooth.  Let dry thoroughly.
    Use paintbrush to cup number labels on craft foam

    Cover hole with glue dot and number label
  7. Gloss finish –  The Triple Thick brand of glaze dries hard and glassy – perfect for shiny pool balls.  Here is the best way I found from experience to get the glossy finish.  Since you have no holes now, you will have to use the wax sticks again.  Place the ball on the wax end so it touches the bottom (the side opposite the number label).  I diluted the gloss with just a little water because mine was too thick (maybe it was a little old).  Paint (or spray) the ball with gloss, including the number label, with a sort of thick coat.  Try not to let it pool too much where the wax stick is. (I put them in one of those “third hand” holders upside down so the gloss would flow toward the number label).
    Paint with gloss glaze.
  8. Let dry overnight.  Next day remove and touch up the space where the wax was touching.

Making the Triangle Rack – this was sort of a trial and error process – no specific measurements except for using the 60 degree angle on the miter box to cut the angles.
  1. First, to determine the size of a triangle I needed, I covered a small area of an index card with a few strips of double stick tape.  Then I took 15 plain unpainted beads and placed them on the tape in a triangle shape – sort of mashing them together – just to get the size and length of wood pieces needed.  (I used unpainted beads because I thought the tape would damage the painted ones)
  2. On the wood stick, cut one end to a 60 degree angle using the miter box.  Hold it against the triangle of beads and mark where the next cut should be. NOTE: add a tiny bit extra length because when they are painted and glazed they will be slightly bigger (I didn’t account for that and had to sand and re-sand the inside of my finished triangle to fit them).  Cut the other end using the 60 degree notch on the miter box.
  3. Now cut two more wood pieces the same size as the first using the miter box.  Trial fit to the bead triangle and adjust by sanding if needed.
  4. You can stain the pieces now (best for avoiding glue spotting and getting in to the tight corners).  The stain pen works well for this.
  5. After staining, glue triangle together with wood glue.  When it is completely dry, round off the outer corners with sandpaper then touch up with the stain pen.

Enjoy your pool ball set!